Guide to checking detailed hardware configuration using CPU-Z on WinPE
After successfully booting into the NHV BOOT WinPE rescue environment, locate and open the CPU-Z icon on the Desktop
The software interface will appear with various functional tabs. To help you avoid getting confused by the array of dry technical figures, NHV BOOT will explain the meaning of each parameter in detail.
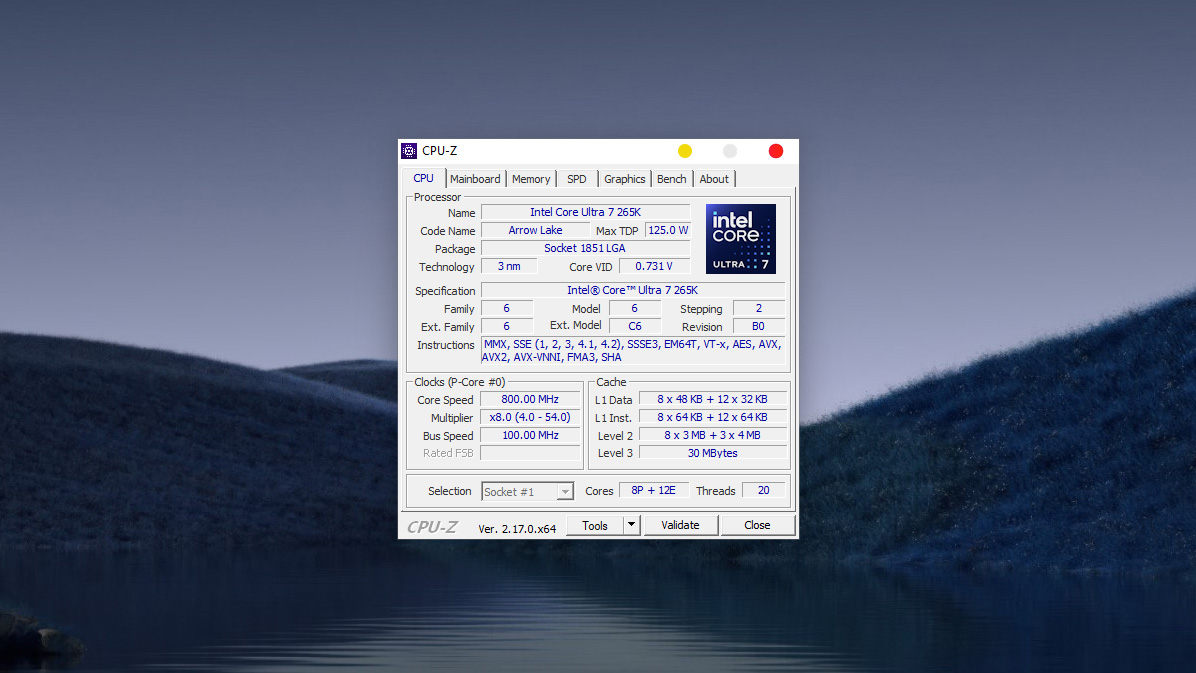
Important parameters to note in the CPU Tab:
- Name: The full name of the processor (Example: Intel Core Ultra 7 265K).
- Code Name: The architecture codename of the chip series (Example: Arrow Lake).
- Max TDP: Maximum power consumption and heat dissipation (Example: 125.0 W) – An important figure for choosing a power supply (PSU) and cooling system.
- Package: The socket type (Example: Socket 1851 LGA) – Essential to know for selecting a compatible motherboard when upgrading.
- Technology: Chip manufacturing process technology (Example: 3 nm) – The smaller the number, the cooler and more power-efficient the chip.
- Core Speed: Current processing clock speed (This parameter changes continuously depending on the system’s heavy or light workload).
- L3 Cache: Level 3 cache memory. The larger the capacity (Example: 30 MBytes), the smoother the multitasking and gaming performance.
- Cores / Threads: Total number of physical cores and processing threads.
- In the image, it is 8P + 12E (8 Performance-cores + 12 Efficient-cores) and 20 Threads. This is the parameter that determines the multitasking power of the machine.
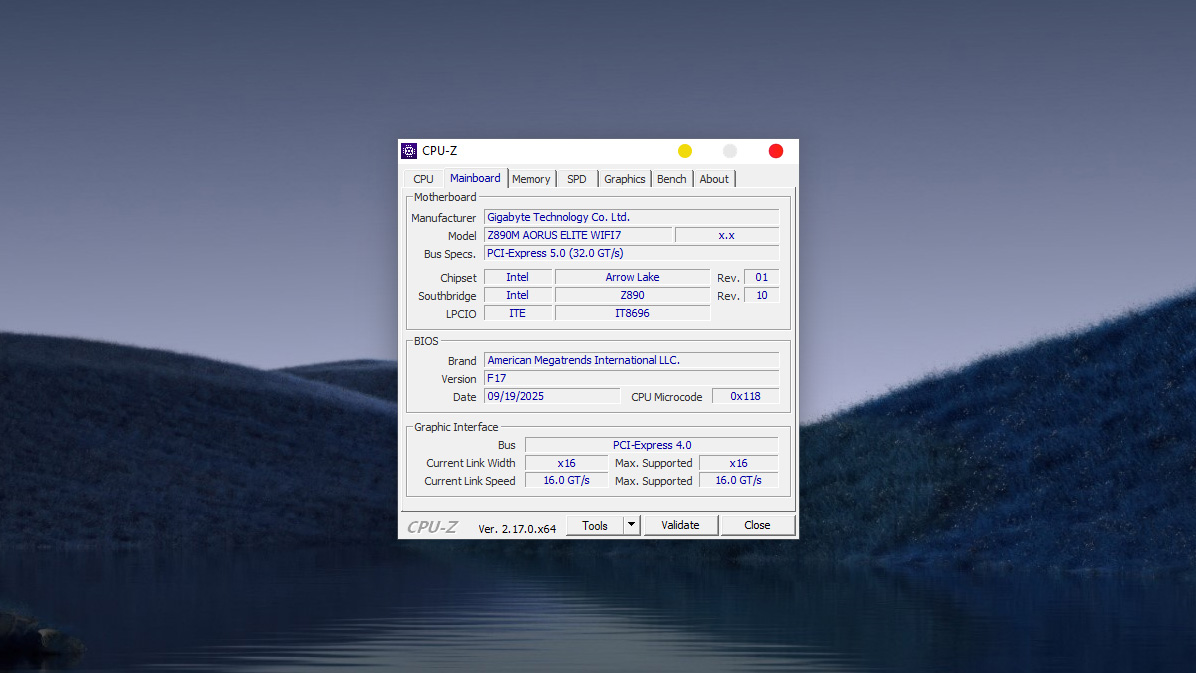
Important parameters to note in the Mainboard Tab:
This tab provides detailed information about the Motherboard – the “backbone” connecting computer components:
- Manufacturer: The brand name that produced the motherboard (Example: Gigabyte Technology Co. Ltd.).
- Model: The specific model code of the product (Example: Z890M AORUS ELITE WIFI7).
- Note: This is the most important information for finding the exact Drivers or looking up the user manual from the manufacturer’s homepage.
- Chipset: The central controller of the Mainboard.
- Example: Intel Z890 (paired with Arrow Lake CPUs). The “Z” series chipset is typically the high-end line that supports Overclocking.
- BIOS (Basic Input/Output System):
- Version: The current BIOS version (Example: F17).
- Date: The release date of this BIOS version (Example: 09/19/2025). This figure helps you know if the BIOS is outdated to decide whether to update it or not.
- Graphic Interface: Information about the graphics card slot (VGA/GPU).
- Bus: Connection standard (Example: PCI-Express 5.0).
- Link Width: The current running lane bandwidth (Example: x16). If you plug in a dedicated card and see x8 or x4, you might have plugged it into the wrong slot, or the contact pins are dirty.
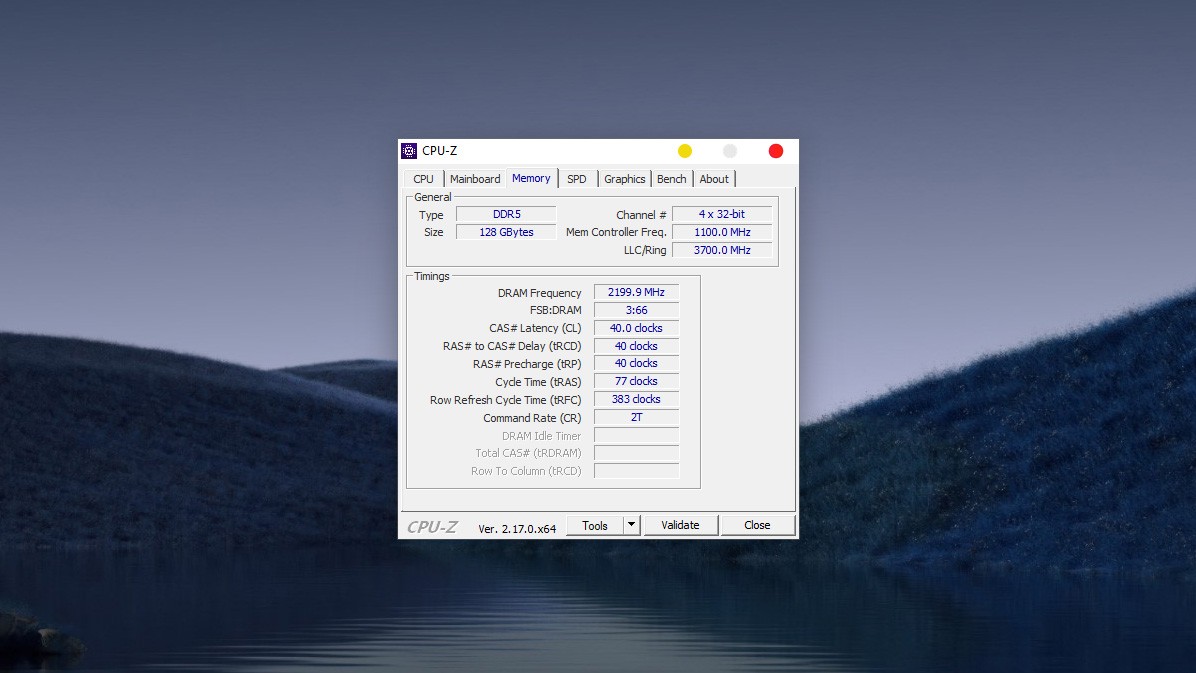
Important parameters to note in the Memory Tab (RAM):
This tab provides details on the capacity, RAM standard, and especially the actual speed running on the system:
- Type (RAM Type): The generation of RAM the machine is using (Example: DDR5).
- Note: You cannot install DDR5 RAM into a DDR4 slot and vice versa.
- Size (Capacity): The total RAM capacity of the entire system (Example: 128 GBytes).
- Channel # (Channel Count): The operating mode of the RAM.
- In the image, it displays 4 x 32-bit. With the DDR5 standard, each RAM stick features two 32-bit sub-channels, so this figure indicates the machine is running Dual Channel – helping to optimize bandwidth and system performance.
- DRAM Frequency (Actual Bus Speed): This is the most commonly misunderstood parameter.
- In the image, it is 2199.9 MHz (approximately 2200 MHz).
- How to calculate the actual speed (Effective Clock): Since it is DDR (Double Data Rate), you need to multiply this number by 2. This means the machine’s actual RAM speed is 4400 MT/s.
- CAS# Latency (CL): The latency of the RAM.
- Example: 40.0 clocks. The lower this number, the faster the RAM responds (typically, DDR4 has lower CL than DDR5, but in return, DDR5 offers higher bandwidth).
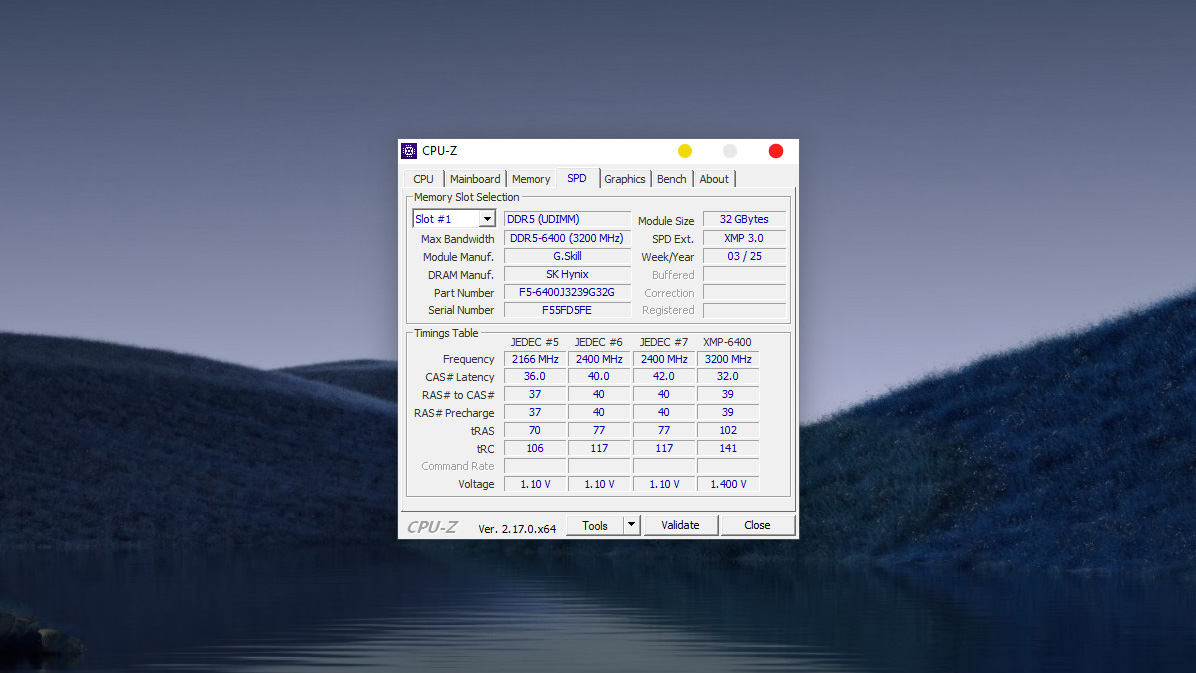
Important parameters to note in the SPD Tab (Detailed view of each RAM module):
- Memory Slot Selection: Where you select the specific RAM slot to view information (Slot #1, Slot #2…). If you select a slot and the fields are blank, it means no RAM is installed in that slot.
- Max Bandwidth: The standard speed rating of that RAM module.
- Example: DDR5-6400 (3200 MHz).
- Module Manuf. (RAM Manufacturer): The brand name of the RAM module (Example: G.Skill).
- DRAM Manuf. (Memory Chip Manufacturer): The manufacturer of the actual memory chips soldered onto the stick.
- Example: SK Hynix. Note: Tech enthusiasts often look for this detail, as SK Hynix chips are generally known to have better Overclocking potential than other brands.
- Part Number: The unique model identifier of the RAM kit (Example: F5-6400J3239G32G).
- Tip: When you want to upgrade or add more RAM, search for this exact code to ensure 100% compatibility.
- SPD Ext. (Extended Configuration): Indicates if the RAM supports pre-configured overclocking profiles.
- Example: XMP 3.0. If you see this, it means you can enter the BIOS and enable XMP to run the RAM at its full rated performance (faster than the default JEDEC standard).
- Timings Table: Lists the supported speed and latency configurations. The last column is usually the highest performance profile (Example: XMP-6400 running at 1.400 V).
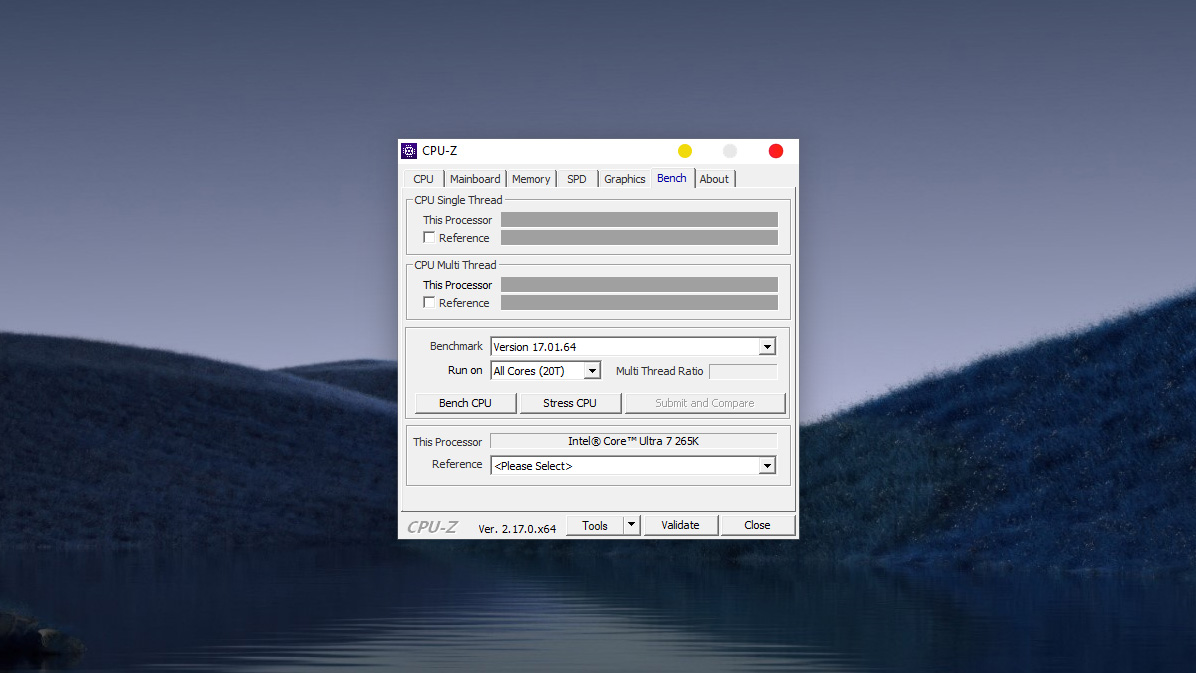
Important features in the Bench Tab (Performance Measurement)
Not just for viewing specifications, CPU-Z integrates a Benchmark tool to help you evaluate the “health” of your CPU via the following function buttons:
- Bench CPU (Score): When you click this button, the software forces the CPU to run complex calculation algorithms to produce a specific score.
- CPU Single Thread: Single-core performance score (important for gaming).
- CPU Multi Thread: Multi-core performance score (important for video rendering, graphic design).
- Stress CPU (Stability Test):
- This feature is used to force the CPU to run at 100% capacity continuously.
- Purpose: Helps you check if the machine overheats, encounters a Blue Screen of Death (BSOD), or shuts down under heavy load. This is very useful when testing used machines or checking a new cooling system.
- Reference (Comparison):
- In this section, you can select another CPU code from the dropdown list (Example: Core i9-14900K or Ryzen 9 7950X).
- CPU-Z will display that CPU’s score next to your machine’s score, making it easy to compare whether your machine is stronger or weaker.
Conclusion
nhvboot.com has walked you through a deep dive into each functional tab of CPU-Z. Mastering technical specifications such as CPU Socket, RAM Bus, or Mainboard Chipset not only helps you avoid being misled when buying used computers but also serves as a crucial basis for making accurate component upgrade decisions, avoiding the situation of buying parts that do not fit.
Don’t forget, this powerful tool is pre-integrated into the NHV BOOT WinPE environment. Download the latest version immediately and purchase a license to own a versatile rescue USB, ready to “diagnose” the health of any computer rig in just seconds!